Tuesday, July 30, 2013

Day 24

Well, today I started by thoroughly cleaning the donor framehead, just to see what I had on my hands.  7 hours later, I had cleaned, prepped, and disassembled it!  I even got to work cutting out part of the old pan where the donor pieces will go.

I was going to wait to hear back from some friends and family about the technique to get the good metal out without damaging it.  I decided just to do it on my own, take it slow, and stop if I encountered a road block.  In the end, I did end up talking to Shawn who basically confirmed what I had already done.

area marked, you can also see the rot/thin metal
inside was as expected.
yummy.

the pan is upside down in this picture but you can easily see where the "water line" is where water got into this area and sat, and sat rotting away the bottom part or "ears" of the Napoleon's hat.

blurry picture, but this is the "new" hat.  It looks like rust, but it is really just red dirt!
the bottom plate of the "new" hat.  also just minor surface rust.  great condition.

what the "ear" looks like separated.

and a better look inside.
So it turned out pretty good.  I prepped the area and will be getting the pieces media blasted before being put back onto the pan.  After that, I need to finish some finishing on my battery section patch, weld the jack point on, and then start finishing the pan!


Remember how terrible the aftermarket parts were...I think getting the right parts will be worth it after all.  Even after the drive to California and back.  :)

Day 23

Well, after plenty of practicing...I decided to do some real welding!  I cut the patch piece from my donor pan, about 1/2" too big and then slowly cut, shaped, and filed the piece so it fit like a glove.
test fit
I did my stitch welding technique moving around the pan.
slowly
all welded
brushed
grinded
holes filled (bottom left), rubber mat studs installed, battery hold down welded, panel welded in!

Circled areas above need a little attention before I paint either with some more weld material or hammer/dolly work.

Only two instances of blow through.  Made some adjustments to technique and was happy with the results.

I sourced a used napoleon's hat in California and needed it ASAP so I drove the 4 hours each way to pick it up.  I will be working on disassembling the piece so I can get what I need out of it and then welding it in.

some dirt and spider webs, but no worse for wear.

I also got a correct 1958 fender that needs a bit of work, but will be good for the project!

Saturday, July 13, 2013

More welding and metal rot discovery

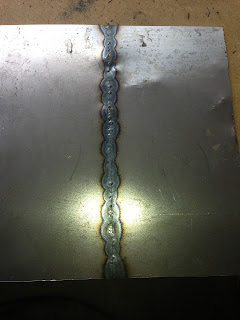
Well I had some free time so I decided to get back into welding and give it a try.  I used some new techniques and was pretty happy with the outcome.  I'm going to one more day of practice, this time on 18 gauge sheet metal which is closer to what the pan is and then start cutting the donor pan for the replacement.


I've also got to weld some holes in the pan, the rubber mat hold downs, and the jack point.

Additionally, I did some more poking and cleaning inside the "napoleon's hat" and found out that I can't just patch this and go.  I need to replace it, it isn't surface rust and it is an important structural part of the car.  Having trouble sourcing the parts so I had hoped I was going to be able to just paint it and be done with it, but I can't let it slide!


I hope to practice weld tomorrow and maybe tackle the pan welding!

Friday, July 5, 2013

More welds, parts, and updates

Well it has been a while since I've updated.  I have continued to practice welding and getting a better hang of it.


I also picked up some 18 gauge metal which is closer to the floor pan I will be welding.  Will practice on this and then hopefully be ok to cut and weld the pan metal.


I also sourced what I thought was a correct fender for my 59 bug.  It was off a 59 bug, however I'm learning that I have some parts that carried over from the 58 model year since my car was made in September.  The model year changed over in August so I have a few of the "left over" parts from the older cars.  Not a big deal, just have to start searching again!

Caroline's friend Jackie did a great job packing up!


The white one is original driver's side, and you can see the red one (new one) doesn't have the same bump for the headlight.

The running board attaches at the bottom of each fender and the white one has the bigger bump = original part.
Also, stopped by the transaxle shop to pick up my axle tubes for sand blasting and painting.  Here's how my transaxle looks now!


Caroline has been in town so progress has been slow.  I'm working a bit next week, but hopefully I can get the metal cut and welded in.  I am a bit stir crazy, but my bank account appreciates the break in credit card orders :)