I did this today!
http://www.thesamba.com/vw/forum/viewtopic.php?t=557798
Friday, May 31, 2013
Thursday, May 30, 2013
Day 16
Parts and pan are at the blaster! Rented a truck from Budget for $33 plus gas. Not a bad deal, easy enough.


Did some more cleaning today, not much. This is the (aftermarket) in line gas filter I had before the pan gas line. Yipes!

Stopped by the paint shop to look into paint codes, materials around $1k.
Big purchases on the horizon include a welder and compressor. Deciding how serious I want to get into this restoration and future projects...
Wednesday, May 29, 2013
Day 15
Today was quite productive! I started by dropping off the transaxle at RC Trans to get overhauled. I'm in no hurry but I also had to get the king/link pin bushings pressed out as well as removing the bearing races in the brake drum. I picked up the pressed out bushings and races later in the afternoon. Two birds, one stone!
I also visited the local car wash and traded them $6 for all my old grease! It was a mess, but I'm glad I got it done. I came straight home and threw all my clothes in the washer. Including my shoes!
I thought I got out without being noticed but the attendant realized what I was doing and asked me to spray down the booth after I was done. But they added free time on, so it was no big deal. I had to wait anyways for the parts to dry!

I then came home and got all the parts degreased and prepped for the blaster. Tomorrow I plan on dropping off the pan and miscellaneous parts at the media blaster.


My seam sealer showed up today, the internal frame coating shipped, and the pan paint is on it's way as well.
In the evening, I ran all over doing errands getting parts and pieces for what I'm going to do next week. Paint brushes, shop vac, solvents, cleaners, wire brushes, and bears oh my!
It's coming together slowly, it's fun to no longer be disassembling as much and at least cleaning. Next will be building up!
An older pic that I forgot to post.
 |
| Bottom degreasing. |
Tuesday, May 28, 2013
Day 14
Progress was slow today. I fully disassembled the front beam which continued to be a mess...this time it was a gooey one with all the grease from 50+ years in the center tubes getting about everywhere. I got smarter and put a cheap tarp down so I could contain it.
I scheduled the media blasting for Thursday/Friday and started ordering my supplies to paint.
I need to get the king/link pins pressed out, the bearing races pulled on the spindles. Can't decide whether to have a shop do it or get a press for around $150...I'm not really going to use it that much though.
Tomorrow I'm going to degrease some parts so they can go to media blasting. Slowly but surely!
Sunday, May 26, 2013
Day 12-13
Well, after getting that stubborn nut off I went ahead and removed the spring plates with a turn buckle trick I learned from a thread on TheSamba.com. I will most likely have to get the proper tool to get them back on because the turn buckle was still a bit short.
I degreased the bottom of the pan, scraped the top of all residual seam sealer, gunk, and miscellaneous stuck things and degreased the top. I removed the accelerator, clutch, heater, and choke cables. I sealed all the holes with duct tape and rags. The pan is ready for the blaster!
I started tonight working on the beam. All but one tie-rod end came off (going to get a pickle fork tomorrow) and I removed the steering box and sway bar. I then started the dirtiest thing I've done yet...scraping off the 50+ years of dirt and grease from the front beam. MAN, you can tell the original owner had it serviced on time because there was tons of caked on dirt and grease that made a mess of me, the garage floor, and all my tools. A pain to clean up but all is well.
Next I am going to continue working on the front beam, have that stripped ready to go to the blaster. At a certain point, I will kind of be done with things on the pan until it comes back from media blast and the transaxle ready from refurbed.
My plan is to get all my prep materials ready. Will cover that when I order them.
Pictures in a day or so, yawnnnnnnnnn I'm tired!
Thursday, May 23, 2013
Day 11
SUCCESS!

Transaxle is off. Prepped for transport to the shop.


Next step is to remove old glue from the pan, finish degreasing, seal off pan holes, then off to the blaster!
Will start working on front beam next...

Transaxle is off. Prepped for transport to the shop.


Next step is to remove old glue from the pan, finish degreasing, seal off pan holes, then off to the blaster!
Will start working on front beam next...
Wednesday, May 22, 2013
Day 9 & 10
Yesterday I finished scraping the undercoating off the bottom of the pan. It was a major pain in the butt. I got most of it off and hope the blaster is kind with his words and invoice :)
After I got that all squared away, I started working on getting the rear axle nuts off. WOW. I thought the undercoating was a pain. To be honest, between yesterday and today's effort and $$$ outpouring, I'm pretty down in the dumps right now!
I bought the $100 special tool that is supposed to work and because the spacing between the gears was too big it would skip gears anytime it had a lot of torque on it. I got one side off. But the other wouldn't budge and I returned it to the store.


Today, I spent about another $150 on a breaker bar, angle iron, steel pipe, and a 36mm socket trying to get the axle nut off. All I ended up with was a bent piece of pipe and angle iron.

And yes, I am turning it counter clockwise :)
I'm really at a loss for what to do. I'm soaking the nut overnight in PB Blaster hoping that it will work. I wrapped a rag around the nut and just saturated it so hopefully it will soak in.
My other options at this point are to call a mobile trucker repair guy to use an impact wrench to get it off. Or drill off the nut...neither of which I am too thrilled about.
Enjoy the pictures, I'm going to have a beer!
After I got that all squared away, I started working on getting the rear axle nuts off. WOW. I thought the undercoating was a pain. To be honest, between yesterday and today's effort and $$$ outpouring, I'm pretty down in the dumps right now!
I bought the $100 special tool that is supposed to work and because the spacing between the gears was too big it would skip gears anytime it had a lot of torque on it. I got one side off. But the other wouldn't budge and I returned it to the store.


Today, I spent about another $150 on a breaker bar, angle iron, steel pipe, and a 36mm socket trying to get the axle nut off. All I ended up with was a bent piece of pipe and angle iron.

And yes, I am turning it counter clockwise :)
I'm really at a loss for what to do. I'm soaking the nut overnight in PB Blaster hoping that it will work. I wrapped a rag around the nut and just saturated it so hopefully it will soak in.
 |
| Perfectly bent angle iron :) |
My other options at this point are to call a mobile trucker repair guy to use an impact wrench to get it off. Or drill off the nut...neither of which I am too thrilled about.
 |
| The pipe hanging is connected to the gas line and filled with acetone to get all the crud out of the line. |
 |
| What the good side looks like! Ready to be sent away to the transaxle shop! |
Enjoy the pictures, I'm going to have a beer!
Tuesday, May 21, 2013
Day 8
I'm actually writing this on the day after I finished the work, because it is after midnight!
Tonight, I spent about 5 hours in the garage. I got the front beam off. It was heavier than I thought! It's on two moving dollys so it can move around semi-easy. I need to get the tie rods off, they seemed to be quite keen on staying on the steering box and the wheel assemblies. More research to see what I'm doing wrong.
Last night, as I wrote before, I started getting the undercoating off. What a pain. Tonight I followed up on what I did last night and removed the smaller bits of undercoating still attached to the passenger pan section. Following some research, I used some oven cleaner to then remove the smaller pieces and also the paint. It seemed to work OK but with either method intense mechanical removal is required.
So, slow but steady progress. Tomorrow I will try to get the rest of the underside prepped enough to send to the blaster. I don't have to or have the patience to get the bottom completely spotless. But the blaster emphasized that he would need a lot more time if there was undercoating on the pan/body. I'm doing my best to keep his time ($$$) as minimal as possible by making my time (worthless) count for something.
Tonight, I spent about 5 hours in the garage. I got the front beam off. It was heavier than I thought! It's on two moving dollys so it can move around semi-easy. I need to get the tie rods off, they seemed to be quite keen on staying on the steering box and the wheel assemblies. More research to see what I'm doing wrong.
Last night, as I wrote before, I started getting the undercoating off. What a pain. Tonight I followed up on what I did last night and removed the smaller bits of undercoating still attached to the passenger pan section. Following some research, I used some oven cleaner to then remove the smaller pieces and also the paint. It seemed to work OK but with either method intense mechanical removal is required.
 |
| "Top" side is good enough to send to blasting, bottom hasn't been touched. |
 |
| Remember, the passenger jack point was already bent! I'm sure this isn't helping but it needs to be fixed anyway, so I'm not overly concerned. |
 |
| Quite a bit of gunk near the transaxle. |
I need to pick up a "torquemeister" or "torque dude" or "torque tool" which is basically a torque multiplier to remove the rear axle nut. Then I'll get the pan set and sent to the blaster, the transmission to the refurb, and start working on the front beam.
Or so that's the plan...
Sunday, May 19, 2013
Day 7
I've been busy with both jobs and had Caroline visiting over the weekend. So little progress.
Tonight I did get the entire brake system removed from the pan. No real issues with it. However, upon further inspection there were quite a few "rust flakes" at the front pan bulkhead, colloquially known as "Napoleon's Hat".
So, I tried scraping and picking out what I could, but couldn't get it all...and one side of the hat isn't even accessible. I'm going to research what it takes to drill the spot welds out, clean the area, and then reweld.
I also started scraping off the old undercoating on the bottom of the pan with a propane torch and 1" putty knife. TEDIOUS. I "finished" one pan half and will need another round. I'm also going to look into a chemical removal to get the last bit of residue and such.
I need to get the pan on it's side to make it easier to work on, but it is too heavy with the transmission and front beam attached. I think my next step will be to remove both the front suspension and transaxle. I then should be able to tip the pan on its side to continue working on the underside of the pan.
Sorry no pictures, no real notable differences anyways! Will have some more when I work on it next time...
Wednesday, May 15, 2013
Day 6 - Separation & Whoever designed tarboard was a masochist!
Houston, we have separation! My captain Paul and the guy who got me the job with Paul, Ron (plus his first officer Marcus) all helped today getting the body put onto the dolly. Without them, impossible!
I also got my newer engine put up on the engine stand. I'll start tearing into that when I don't have things to work on. I put the newer engine on the stand as I think it will be an easier, cheaper fix, and parts are more readily available. I'll "learn" on that engine and then spend time on the 36hp original one.
Some grease pen markings I forgot to post yesterday.

And pictures of the dolly setup.


I took the time to scrape off the remaining tarboard on the tunnel and it was a pain. Not so much the tarboard but the glue really required some scraping. But it is good enough for the blaster!


I also got my newer engine put up on the engine stand. I'll start tearing into that when I don't have things to work on. I put the newer engine on the stand as I think it will be an easier, cheaper fix, and parts are more readily available. I'll "learn" on that engine and then spend time on the 36hp original one.
Some grease pen markings I forgot to post yesterday.

 |
| I have no idea what they mean. |


 |
| I can still park my car in the garage and easily work on the bug! |

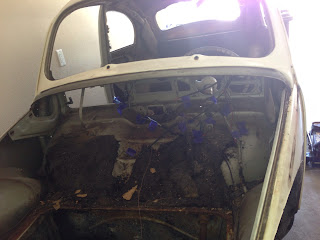
I also identified (highlighted) some of the problem areas.
 |
| Passenger jack point is bent, hopefully can bend back and weld. New ones are available if needed... |

 |
| The support bracket for the clutch cable was broken, which explains why it's been a pain to adjust! |
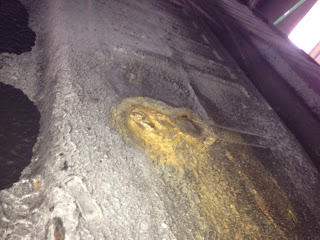
 |
| Typical battery pan rust hole. Uncovered the poorly done patch. |
Next will be to remove brake lines. Turn the pan on its side, remove the undercoating. Then remove the front suspension. Transaxle to overhaul and pan to the blaster. Moving along...
Tuesday, May 14, 2013
Day 5
So, although I have been titling the posts "Day 1, 2, 3, etc" they haven't coincided with the date that I actually accomplished the work. Well, since I am caught up, I'll continue using my work day numbering, but hopefully there is a good sense of how long things are taking as you'll be able to look at the dates too.
If I shouldn't work on it for a while, I'll still try to provide updates so it doesn't get boring and then also explain why the hold up!
Today, I just went out into the garage looking to tinker with what I still could before the body has to come off.
I started in the engine compartment and removed the tarboard and decklid seal. The seal proved to be very time consuming as the rubber had become very hard. I had to devise a vice grip, bent nail tool to "claw" out the old rubber...one small piece at a time. But all is well...
Then I started work inside and removed the tarboard on the parcel shelf. I also removed all the padding from the headliner, straightened the tack strips, and did a general clean up. Taking these materials off allows me to truly see the color the car was from the factory. It is definitely less green and more beige/grey. I like it.


Although the color is not the most excited for the 59 model year, I like it and I want it to be ORIGINAL!
Pop-up flight tomorrow means my morning plans to separate the body/pan will hopefully happen in the afternoon. My captain, Paul and previous interviewer Ron are going to help. 3 people, body dolly built, maybe even put an engine up on the stand since I'll have help with me!
If I shouldn't work on it for a while, I'll still try to provide updates so it doesn't get boring and then also explain why the hold up!
Today, I just went out into the garage looking to tinker with what I still could before the body has to come off.
I started in the engine compartment and removed the tarboard and decklid seal. The seal proved to be very time consuming as the rubber had become very hard. I had to devise a vice grip, bent nail tool to "claw" out the old rubber...one small piece at a time. But all is well...
 |
| That adhesive will be fun to get off :) |
Then I started work inside and removed the tarboard on the parcel shelf. I also removed all the padding from the headliner, straightened the tack strips, and did a general clean up. Taking these materials off allows me to truly see the color the car was from the factory. It is definitely less green and more beige/grey. I like it.


| Click this to see all the colors for the model year. The Fjord blue and Mignonette green are nice. BUT, diamond grey will definitely work :) |
Pop-up flight tomorrow means my morning plans to separate the body/pan will hopefully happen in the afternoon. My captain, Paul and previous interviewer Ron are going to help. 3 people, body dolly built, maybe even put an engine up on the stand since I'll have help with me!
Monday, May 13, 2013
Day 5
Dolly built.


Steering wheel off.
Escutcheon tool received and pieces removed.
Front end of body has been stripped of wiring, bolts, attachments, old tar board, etc etc etc.
Removed pedal assembly, carpet tacks, high beam switch.
Next up. Continue working on removing old rubber, headliner material, clean up.
Body removal pushed back, had a pop up trip come up for Wednesday.
Day 4
Today, I went around to a media blaster to see how much it would be to get the pan and body walnut shell blasted to get rid of the old paint and some rust. He quoted me $1000-1300 which I think is high. I have another guy in Phoenix which is a drive but he is the go to guy in the southwest for bug media blasting. Going to ask for a quote. Will also consider spot blasting and use mechanical/chemical removal of easy to access areas.
Then I drove to the local VW transmission shop and got a quote to tear down, repair, replace, and refurbish the transaxle for $699...a great deal. Places in California are charging about $500 but with the travel, gas, and possible warranty claim issues, I think I'm going with the Vegas people. Reputable shop too.
Finally, I drove to the "bug painter" in town who is the guy to go to. Unfortunately, turns out he was killed last February in a motorcycle accident. BUT, happened to drive around a bit and found some open shop space with a bunch of old VW buses and made a contact with local VW guys. Going to help me source some of the parts I need. COOL!
The real mission for the day was to get materials to build my body dolly which I'm going to use to move the body around the garage easily. Here is a link to the plans I am using. I'm going to build the dolly tomorrow but seeing as I had finally gotten all the body/pan bolts out...I JUST HAD TO see if the body would come off the pan. With some light screwdriver prying to release the old seal, the body separated from the pan for the first time since September 4, 1958! Wooohoooo! I raised it about an inch and then gently set it back down on the pan :)
I continued to disassemble the front part of the car. Still struggling with the splined shaft of the steering column, rusted solid. Will heat up tomorrow and and use some mechanical persuasion to help it! As soon as the dolly is finished, I'm going to wrangle some people and get the body separated and on the dolly so I can work on the pan.
Day 3
Passenger side bolts are all out. Driver's side are proving to be a real headache, soaking each day with penetrating oil. Removed some really old crusty rubber from the front underneath where the hood would sit. Removed the speedo, fuse holder, and most wiring. Windsheild wiper motor. Some of the switches. Need a special escutcheon tool for the others. Don't worry Dad(s), I labeled all of it and took lots of pictures! Removed the dash trim, accessory tach.
Attempted to remove steering wheel but the splines that it attaches to on the steering box are rusted together. Soaking in oil, will see about tomorrow. Only casualties for the day was a piece of dash trim that snapped when I removed it. And a piece of felt/cardboard behind a trim panel. Easily replaceable!
Plan will be to continue working on removing the old rubber, trying to get the bolts out, and starting to remove the old tar board in the trunk, and underneath where the headliner used to be. Problem areas so far...
1) Pan section underneath battery was poorly replaced in the past.
2) Driver's side A pillar is rusted through. Replacement part available, suspect that because the A pillar is rusted, water was getting down into that heater channel which would help explain why the bolts are hard to get out. Heater channel may need replacing? Passenger side all came out easily, except for one which require some more effort.

3) Passenger side rear rocker needs replacement, rusted through. Replacement part available, however not sure if it is big enough to cover the problem area. Can source original parts, looking.

Attempted to remove steering wheel but the splines that it attaches to on the steering box are rusted together. Soaking in oil, will see about tomorrow. Only casualties for the day was a piece of dash trim that snapped when I removed it. And a piece of felt/cardboard behind a trim panel. Easily replaceable!
Plan will be to continue working on removing the old rubber, trying to get the bolts out, and starting to remove the old tar board in the trunk, and underneath where the headliner used to be. Problem areas so far...
1) Pan section underneath battery was poorly replaced in the past.
2) Driver's side A pillar is rusted through. Replacement part available, suspect that because the A pillar is rusted, water was getting down into that heater channel which would help explain why the bolts are hard to get out. Heater channel may need replacing? Passenger side all came out easily, except for one which require some more effort.
3) Passenger side rear rocker needs replacement, rusted through. Replacement part available, however not sure if it is big enough to cover the problem area. Can source original parts, looking.
Day 2
Seats out. Doors off. Windows out. Started removing the pan/body bolts. Removed gas tank. Removed headliner and carpet. Anyone want 10 gallons of brown gas?


Subscribe to:
Posts (Atom)