The past couple of days have shown some good progress. No pictures, unfortunately.
First, I started blocking all the larger parts. I got one door done yesterday and made a run to the paint store for more primer filler to the tune of $500. Silly that most of it will be sanded away anyway, but it's the good stuff!
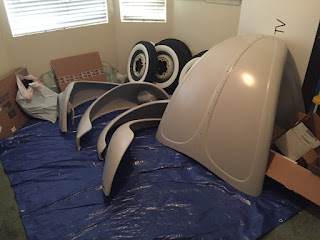
Today, I got the other door done and 4 fenders. I switched up my technique because using 400 grit to start I was taking a long time and using a lot of paper. Instead, I started with 220 to get most of the major issues taken care of. I didn't even go on to 400 and 600 because all the fenders and doors will most definitely need another spray coat of primer filler to even out the imperfections. Some of them may need two more coats.
Tomorrow I hope to get the decklid and hood done. Then I should be ready to spray another coat of primer. While that cures over a couple days I'll start blocking the actual body.
Good to see progress!
Tuesday, July 28, 2015


Sunday, July 26, 2015
Day 168
Some more progress today.
First, I sourced a replacement visor for the one that was broken during "restoration". It should be here Monday and I'll get it sent out to get restored, properly. I also sourced a couple horn buttons which are in nice shape to replace mine which has a bunch of cracks and crazing.
Today, I started block sanding some of the small parts getting them laser smooth for the final paint application. I started with all the "small" parts for the car. The rear tail light housings, license light housing, brackets, supports, speedometer cable tube, the dash grills, etc.
About half of them blocked out fine the first try. I started with 400 grit and then went to 600. They turned out nice.
The other half were suspect to begin with so I blocked them until I started to see metal showing and stopped! The idea is to sand down the high spots to meet the low spots. Well if the low spot is the metal, you can't sand anymore. The next step is to apply more primer filler to raise the lows and then block it again. This could go 3 or 4 times. Because I spent quite a bit of time on body work I'm hoping to only have to prime twice, but I'll see and do what it takes to do a good job.
Here's a sample of what I was doing. First I sprayed a guide coat which is a contrasting color onto the piece. Then with the sand paper and a flat block (of rubber-ish material) I sand in an X pattern to get the primer flat.

As you can see below the guide coat slowly gets sanded off as the high spots are brought down to the lows. More or less you are trying to take the peaks down to the valleys to make a nice plain. A topography analogy, brilliant!

This glove box door was one of the pieces I could not get flat on the first try. As you can see, there is filler (blue) showing through which is the same as sanding to metal. There is also metal showing on the bottom right. The next step in this process is back into the paint booth to apply more primer filler onto the piece. This will bring the valleys up higher which allows them to meet the bottom of the peaks when sanded down again. Make sense?

I'm going to run to the paint store tomorrow. I need some more primer filler ($$$), guide coat, and some other odds and ends.
I have the fenders, doors, hood, decklid, and full body left to sand...a lot of repetitive motion in my future!
First, I sourced a replacement visor for the one that was broken during "restoration". It should be here Monday and I'll get it sent out to get restored, properly. I also sourced a couple horn buttons which are in nice shape to replace mine which has a bunch of cracks and crazing.
Today, I started block sanding some of the small parts getting them laser smooth for the final paint application. I started with all the "small" parts for the car. The rear tail light housings, license light housing, brackets, supports, speedometer cable tube, the dash grills, etc.
About half of them blocked out fine the first try. I started with 400 grit and then went to 600. They turned out nice.
The other half were suspect to begin with so I blocked them until I started to see metal showing and stopped! The idea is to sand down the high spots to meet the low spots. Well if the low spot is the metal, you can't sand anymore. The next step is to apply more primer filler to raise the lows and then block it again. This could go 3 or 4 times. Because I spent quite a bit of time on body work I'm hoping to only have to prime twice, but I'll see and do what it takes to do a good job.
Here's a sample of what I was doing. First I sprayed a guide coat which is a contrasting color onto the piece. Then with the sand paper and a flat block (of rubber-ish material) I sand in an X pattern to get the primer flat.

As you can see below the guide coat slowly gets sanded off as the high spots are brought down to the lows. More or less you are trying to take the peaks down to the valleys to make a nice plain. A topography analogy, brilliant!

This glove box door was one of the pieces I could not get flat on the first try. As you can see, there is filler (blue) showing through which is the same as sanding to metal. There is also metal showing on the bottom right. The next step in this process is back into the paint booth to apply more primer filler onto the piece. This will bring the valleys up higher which allows them to meet the bottom of the peaks when sanded down again. Make sense?

I'm going to run to the paint store tomorrow. I need some more primer filler ($$$), guide coat, and some other odds and ends.
I have the fenders, doors, hood, decklid, and full body left to sand...a lot of repetitive motion in my future!
Thursday, July 23, 2015
Day 167
Well it's been a few weeks since I had any real progress. Work and life get in the way I guess.
It hasn't been as insanely hot so it is hospitable in the garage, which is a good thing.
Today, I got the interior items (and my last "random" color!!!) sprayed. L471 Stone Beige is the color.
Overall, very happy with the results. This is a single stage paint and I don't know if it is my technique or what but I really enjoy spraying it. It lays out so much better than the epoxy primer with NO runs. I feel like a pro shooting it.
Next step is sanding, sanding, sanding all the body parts!
It hasn't been as insanely hot so it is hospitable in the garage, which is a good thing.
Today, I got the interior items (and my last "random" color!!!) sprayed. L471 Stone Beige is the color.
Overall, very happy with the results. This is a single stage paint and I don't know if it is my technique or what but I really enjoy spraying it. It lays out so much better than the epoxy primer with NO runs. I feel like a pro shooting it.
 |
| Setup. |
 |
| Ready to spray. |
 |
| Results |
Next step is sanding, sanding, sanding all the body parts!
Monday, July 13, 2015
Day 163 - 166
It has been almost a month since the last update!
I have had progress just a bit slower than I'd like and with less frequent updates.
Everything has been primed and is ready to be block sanded now. The body turned out pretty good although there are several runs in the paint I have to take care of. It's very strange because on the color coats I had almost no issues with the runs and when it came to the primer it was a bit more troublesome. Anyway, no big deal as I can sand out the the problems before my final coat of paint.
I also sent out my rear view mirror for restoration and it came back broken which was a bit of a shame. The company that did it is looking for a new one, we'll see what happens.


And I was able to get the glass logo etched on my side windows. They turned out pretty good and I'm happy with them!


When I have some free time I'm going to finish painting the ivory items for the inside of the car and then off to block sand!
I have had progress just a bit slower than I'd like and with less frequent updates.
Everything has been primed and is ready to be block sanded now. The body turned out pretty good although there are several runs in the paint I have to take care of. It's very strange because on the color coats I had almost no issues with the runs and when it came to the primer it was a bit more troublesome. Anyway, no big deal as I can sand out the the problems before my final coat of paint.
I also sent out my rear view mirror for restoration and it came back broken which was a bit of a shame. The company that did it is looking for a new one, we'll see what happens.


And I was able to get the glass logo etched on my side windows. They turned out pretty good and I'm happy with them!


When I have some free time I'm going to finish painting the ivory items for the inside of the car and then off to block sand!
Wednesday, June 17, 2015
Day 162
Another productive day!
I finished all my black items which was the bumper supports and brackets. I also had to touch up an under seat spring. They turned out nice.
And then I went about getting the rest of the body parts in primer. I was just going to do the doors and underside of the hood but remembered I still had some small parts to do too!

I did get my doors mounted on one of the fender poles. A little bit of a challenge getting the first screw started while holding the doors by myself but they went up and it worked!
Everything turned out ok, I think I am going to have quite a bit more smoothing work on the doors to do. I did my best to get them flat before primer but it isn't as good as I'd like. Will see what happens when I block sand but will probably end up doing more filler work and priming again. We'll see.
I finished all my black items which was the bumper supports and brackets. I also had to touch up an under seat spring. They turned out nice.
And then I went about getting the rest of the body parts in primer. I was just going to do the doors and underside of the hood but remembered I still had some small parts to do too!

Everything turned out ok, I think I am going to have quite a bit more smoothing work on the doors to do. I did my best to get them flat before primer but it isn't as good as I'd like. Will see what happens when I block sand but will probably end up doing more filler work and priming again. We'll see.
Tuesday, June 16, 2015
Day 161
Well, as expected I have and will continue to be very busy with work and some fun things too!
I was able to re-adjust my fender stands so that each fender was on a separate stand. Made for easier painting, less overspray and overall better experience. I will adjust two of them as the fender was a bit high on each pole. No big deal though.

I got the fenders, decklid, and half the hood painted today. I will finish up tomorrow with the other side of the hood and the doors. This layer of paint builds up enough coverage so that I can sand it flat before final color application. I was happy overall with the results. A couple runs which I can be better about. I also found some areas where my body work beneath the newly sprayed paint revealed I could have done a better job. Missed a couple dings and dents, some filler here and there. But all of that can be fixed in due time.

I'm also going to try and paint the remaining black items tomorrow. But pretty good day!
I was able to re-adjust my fender stands so that each fender was on a separate stand. Made for easier painting, less overspray and overall better experience. I will adjust two of them as the fender was a bit high on each pole. No big deal though.

I got the fenders, decklid, and half the hood painted today. I will finish up tomorrow with the other side of the hood and the doors. This layer of paint builds up enough coverage so that I can sand it flat before final color application. I was happy overall with the results. A couple runs which I can be better about. I also found some areas where my body work beneath the newly sprayed paint revealed I could have done a better job. Missed a couple dings and dents, some filler here and there. But all of that can be fixed in due time.


I'm also going to try and paint the remaining black items tomorrow. But pretty good day!
Tuesday, June 2, 2015
Day 160
Work is going to really start picking up these next few weeks and I'll have little time to work on the car. BUT, in between work and rest I will be able to get some small projects done.
Today I did some media blasting to get the bumper spacers and new bumper support tubes I bought all clean. They need to be epoxy primed and then painted black. I have a couple other items that need to be painted black as well.
The big project today was designing and building a fender support system. One of the issues I had with painting the small parts is either overspray on a 2nd coat on the backside of a part or it was sticking to the paper if I tried to do both sides. It was kind of messy when I did primer and better with the small parts. But for the stuff people are going to actually look at I need to make sure my system works.
The fenders are also very awkward and I needed a solid support so that they didn't sway with the air pressure of my paint gun.

So, I came up with a system that takes a 2x4 and runs down from an overhead piece of wood that is part of my paint booth. I re-used some old parts of my dolly when I cut it down a bit as feet and got it all put together. I then supported the fenders with one through bolt and a horizontal arm with two more support bolts.

This setup should allow me to spray paint on both sides at once. I'm going to try it with the primer filler and see how well it works. If it's difficult to get to all the nooks and crannies I can still mask off areas I don't want painted and do each side one at a time.
Another positive is that because I will be spraying a metallic paint the parts need to be sprayed in the orientation that they will be on the car. That is because the tiny metal flakes in the paint will flow with gravity and if not painted the way it would be on the car (like the rest of the car is painted) it will be noticeable.
We'll see how it works!
Today I did some media blasting to get the bumper spacers and new bumper support tubes I bought all clean. They need to be epoxy primed and then painted black. I have a couple other items that need to be painted black as well.
The big project today was designing and building a fender support system. One of the issues I had with painting the small parts is either overspray on a 2nd coat on the backside of a part or it was sticking to the paper if I tried to do both sides. It was kind of messy when I did primer and better with the small parts. But for the stuff people are going to actually look at I need to make sure my system works.
 |
| This is for the rears and each fender will be on opposite sides of the vertical board. above and below each other. |

So, I came up with a system that takes a 2x4 and runs down from an overhead piece of wood that is part of my paint booth. I re-used some old parts of my dolly when I cut it down a bit as feet and got it all put together. I then supported the fenders with one through bolt and a horizontal arm with two more support bolts.

This setup should allow me to spray paint on both sides at once. I'm going to try it with the primer filler and see how well it works. If it's difficult to get to all the nooks and crannies I can still mask off areas I don't want painted and do each side one at a time.
Another positive is that because I will be spraying a metallic paint the parts need to be sprayed in the orientation that they will be on the car. That is because the tiny metal flakes in the paint will flow with gravity and if not painted the way it would be on the car (like the rest of the car is painted) it will be noticeable.
We'll see how it works!
Subscribe to:
Posts (Atom)